FortiManager API Guide
Introduction
The FortiManager API provides programmatic access to all FortiManager functions, enabling you to automate device management, policy deployment, and configuration tasks. This guide will teach you how to discover API calls, understand their structure, and implement them in your automation workflows.
Why Use the FortiManager API?
Common Use Cases
- Bulk Policy Deployment - Push firewall policies to multiple devices
- Device Onboarding - Automatically configure new FortiGates
- Compliance Reporting - Extract configuration data for auditing
Chapter 1: Discovering API Calls with Browser DevTools
The easiest way to understand FortiManager APIs is to watch what happens when you use the web interface. Your browser’s Developer Tools can reveal the exact API calls behind every action.
Method 1: Using Chrome DevTools
Step-by-Step Process:
Login to FortiManager.

Open Developer Tools
- Press
Ctrl + Shift + I(Windows/Linux) orCmd + Option + I(Mac) - Alternatively, press
F12 - Or right-click and select “Inspect”
- Press
Prepare Network Monitoring
- Click on the Network tab in DevTools
- Clear any existing entries by clicking the clear button (🚫)
- Ensure recording is active (red record button should be pressed)
Execute the Action
- In the FortiManager web interface, perform the action you want to replicate
- Examples: Create a policy, add a device, modify settings
Filter and Analyze
- In the DevTools Network tab, type
jsonin the filter box - This shows only API calls that send/receive JSON data
- Click on any API call to see details
- In the DevTools Network tab, type
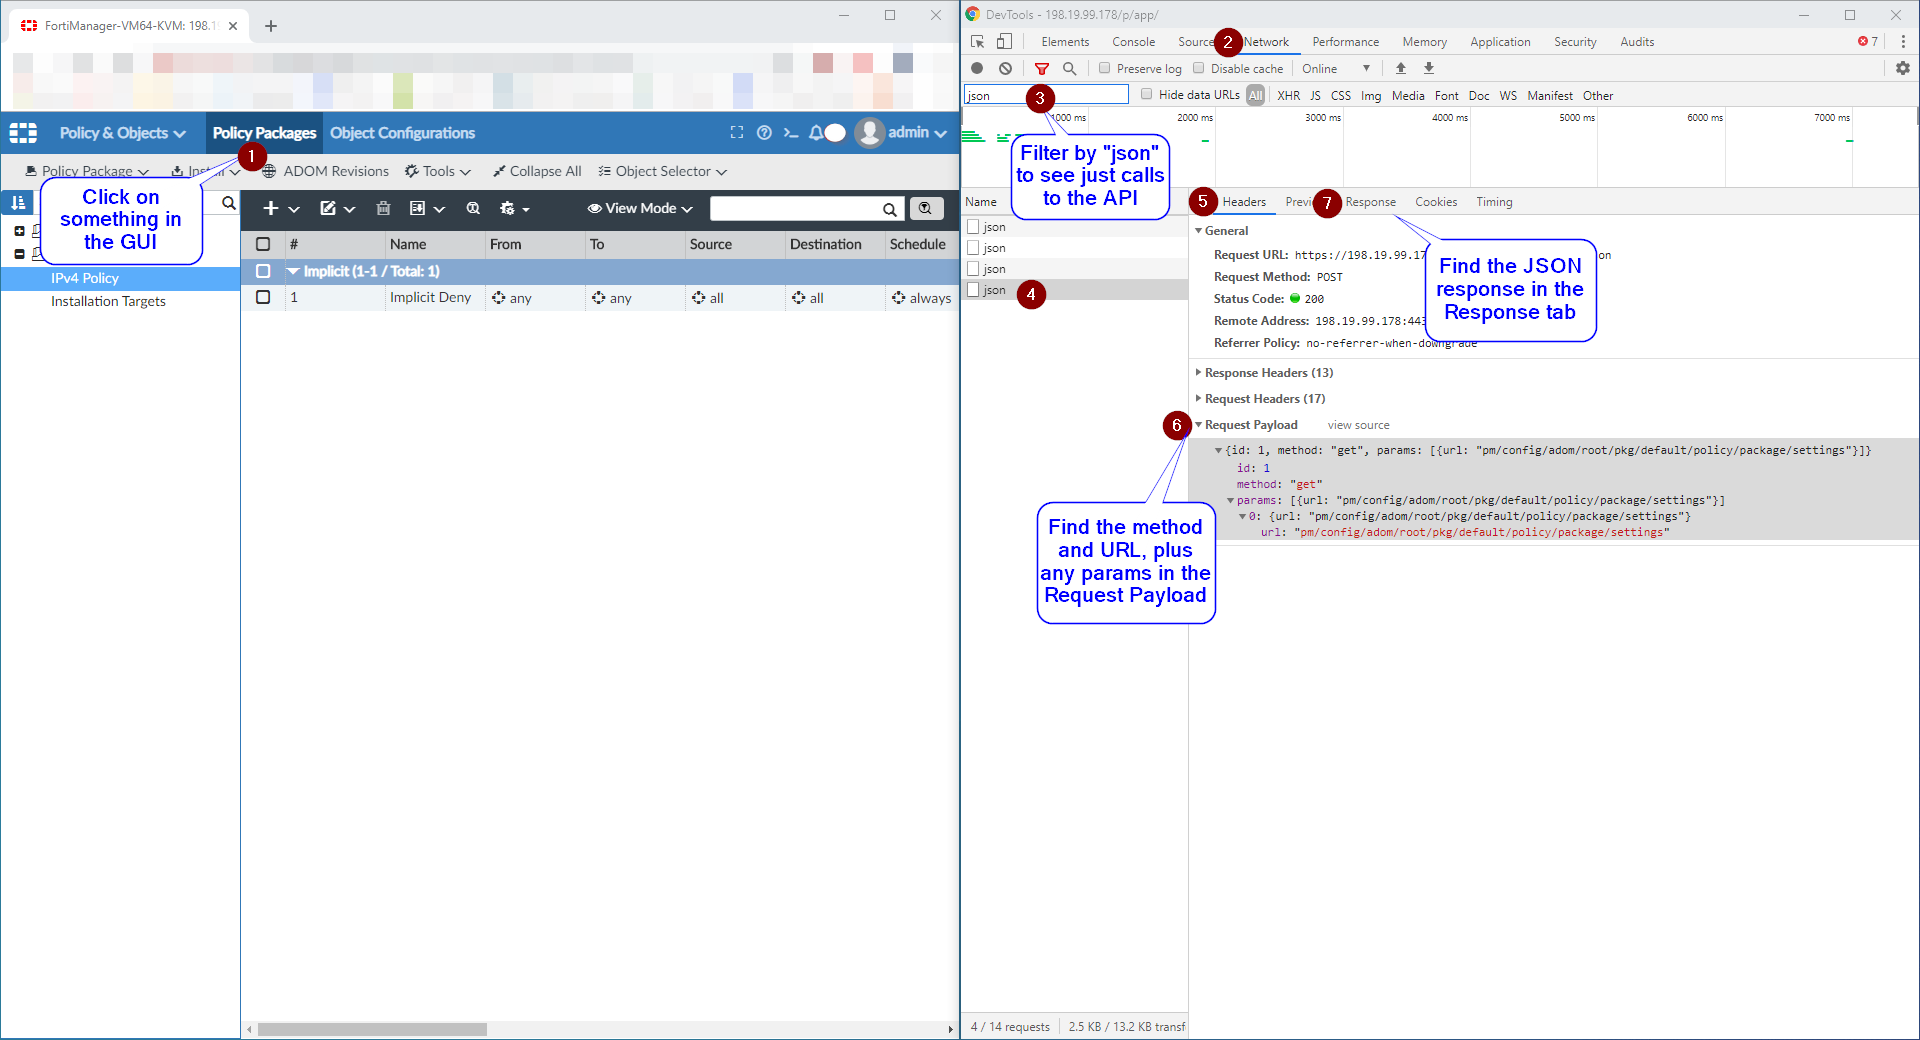
What You’ll See in DevTools
Request Headers Section:
Request URL: https://your-fmg.company.com/jsonrpc
Request Method: POST
Content-Type: application/json
Request Payload (Body):
{
  "method": "get",
  "params": [
    {
      "url": "/pm/config/adom/root/obj/firewall/policy",
      "option": [
        "get meta"
      ]
    }
  ],
  "session": "abc123session456",
  "id": 1
}
Response:
{
"result": [
{
"status": {
"code": 0,
"message": "OK"
},
"url": "/pm/config/adom/root/obj/firewall/policy",
"data": [
...
]
}
],
"id": 1
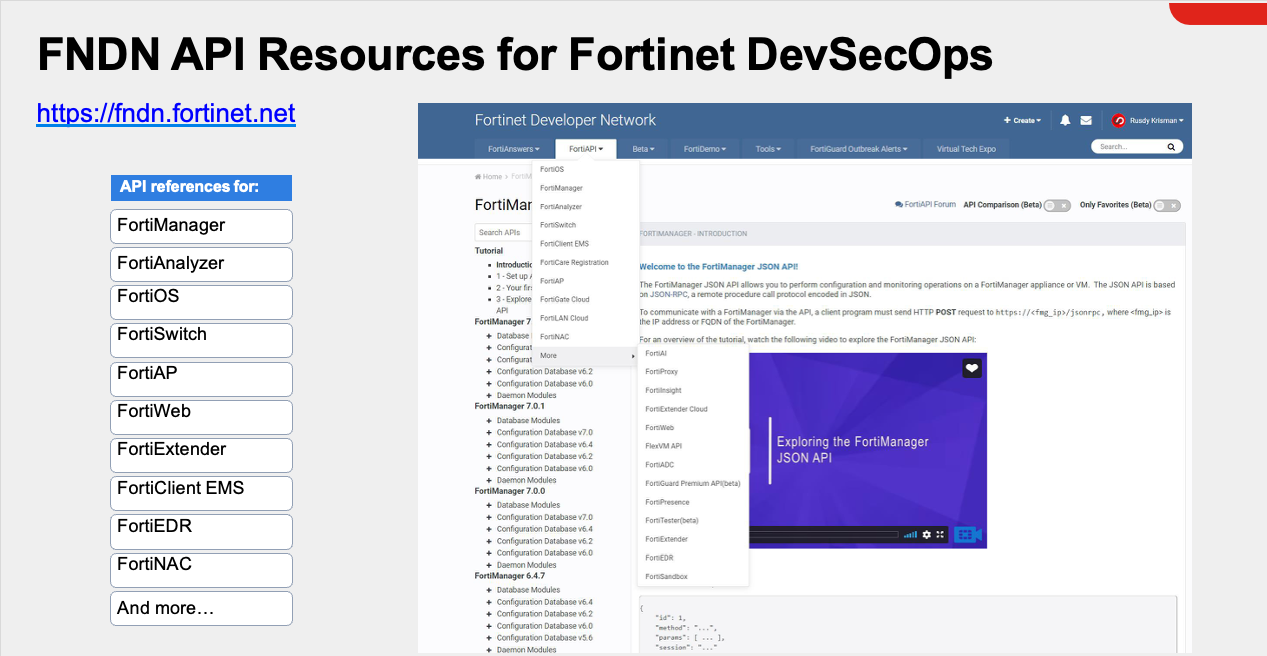
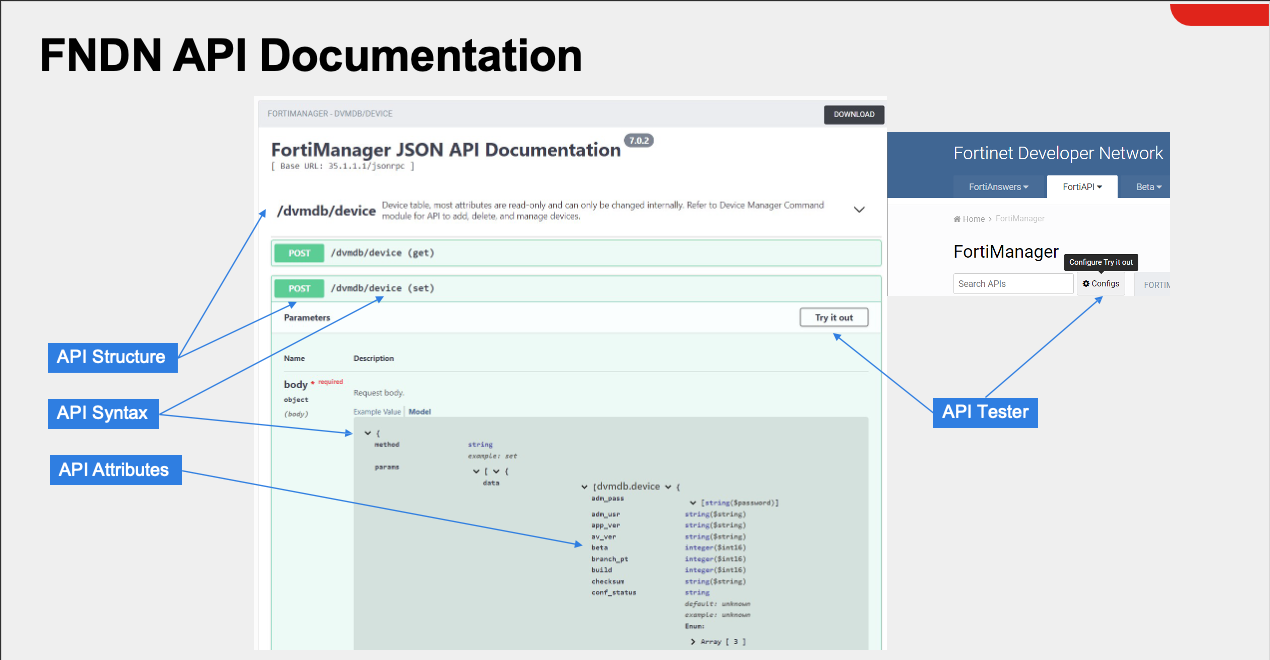
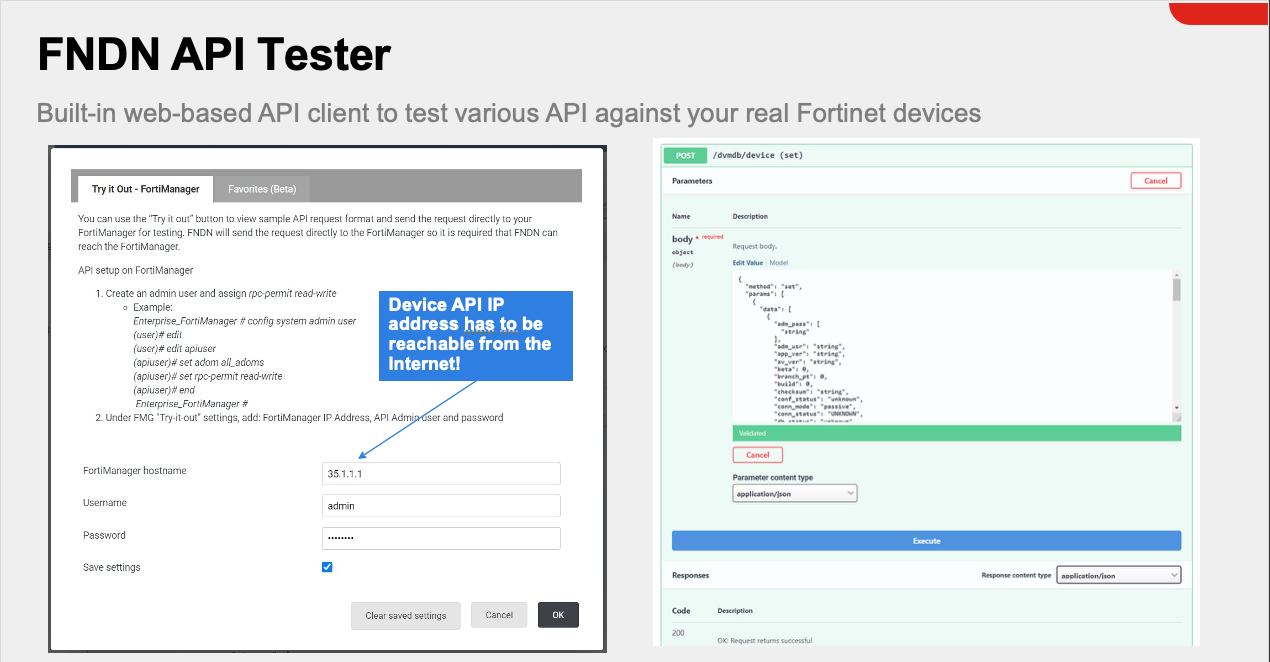
}Method 2: Use the Fortinet Developer Network (FNDN)
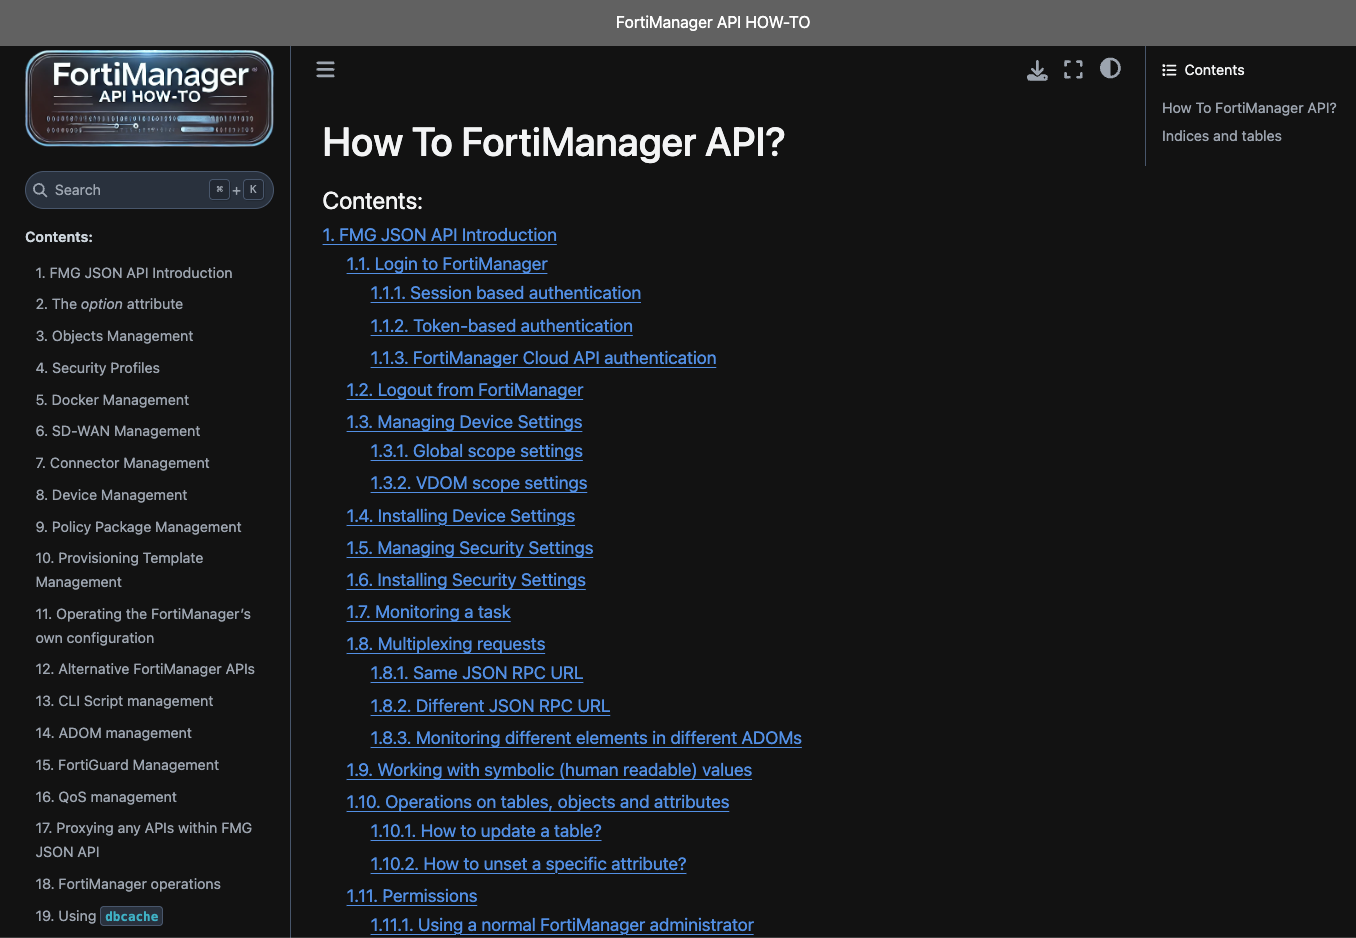
Method 3: FMG API By Example
This is my favorite method by far. This is an example based API Doc that has examples of API calls with an easily searchable interface.
https://how-to-fortimanager-api.readthedocs.io/en/latest/index.html
Chapter 2: Understanding FortiManager API Structure
JSON-RPC Format
FortiManager uses JSON-RPC 2.0 protocol for API communication. Every request follows this structure:
{
  "method": "operation_type",
  "params": [
    {
      "url": "/api/endpoint/path",
      "data": {
        object_data
      },
      "option": [
        "additional_options"
      ]
    }
  ],
  "session": "session_token",
  "id": request_id
}
Common Methods
| Method | Purpose | Example Use |
|---|---|---|
get | Retrieve data | Get firewall policies, device status |
add | Create new objects | Add address objects, create policies |
set | Modify existing objects | Update policy settings, change device config |
delete | Remove objects | Delete policies, remove devices |
update | Bulk updates | Mass policy changes |
clone | Copy objects | Duplicate policies or objects |
move | Reorder items | Change policy sequence |
URL Structure Patterns
FortiManager API URLs follow predictable patterns:
Device Management:
/dvmdb/device/{device}/device- Device operations
Policy & Objects:
/pm/config/adom/{adom}/obj/firewall/address- Address objects/pm/config/adom/{adom}/obj/firewall/policy- Firewall policies/pm/config/adom/{adom}/obj/firewall/service/custom- Service objects
System Operations:
/sys/status- System status/sys/login/user- User management
Response Structure
All API responses follow this format:
{
  "result": [
    {
      "status": {
        "code": 0,
        "message": "OK"
      },
      "url": "/pm/config/adom/root/obj/firewall/address",
      "data": [
        {
          "name": "Test-Server",
          "uuid": "550e8400-e29b-41d4-a716-446655440000",
          "type": "ipmask",
          "subnet": [
            "192.168.100.50",
            "255.255.255.255"
          ]
        }
      ]
    }
  ],
  "id": 1
}
Status Codes:
0- Success-2- Object already exists-3- Object does not exist-6- Invalid url-10- Data is invalid for selected url-11- No permission
Chapter 3: Common API Operations
Getting Firewall Policies
Request:
{
  "method": "get",
  "params": [
    {
      "url": "/pm/config/adom/root/pkg/default/firewall/policy"
    }
  ],
  "session": "your-session",
  "id": 1
}
Creating Address Objects
Request:
{
  "method": "add",
  "params": [
    {
      "url": "/pm/config/adom/root/obj/firewall/address",
      "data": {
        "name": "WebServer-DMZ",
        "type": "ipmask",
        "subnet": [
          "10.0.100.10",
          "255.255.255.255"
        ],
        "comment": "DMZ Web Server"
      }
    }
  ],
  "session": "your-session",
  "id": 1
}
Bulk Operations: Creating Multiple Objects
Request:
{
  "method": "add",
  "params": [
    {
      "url": "/pm/config/adom/root/obj/firewall/address",
      "data": [
        {
          "name": "Server-01",
          "type": "ipmask",
          "subnet": [
            "192.168.10.10",
            "255.255.255.255"
          ]
        },
        {
          "name": "Server-02",
          "type": "ipmask",
          "subnet": [
            "192.168.10.11",
            "255.255.255.255"
          ]
        },
        {
          "name": "Server-03",
          "type": "ipmask",
          "subnet": [
            "192.168.10.12",
            "255.255.255.255"
          ]
        }
      ]
    }
  ],
  "session": "your-session",
  "id": 1
}
Installing Policies to Devices
After creating or modifying policies, install them to devices:
Request:
{
  "method": "exec",
  "params": [
    {
      "url": "/securityconsole/install/package",
      "data": {
        "adom": "root",
        "pkg": "default",
        "scope": [
          {
            "name": "FortiGate-01",
            "vdom": "root"
          },
          {
            "name": "FortiGate-02",
            "vdom": "root"
          }
        ]
      }
    }
  ],
  "session": "your-session",
  "id": 1
}
FortiGate API Calls via FortiManager (Proxy Method)
FortiManager maintains established tunnels to FortiGate devices, allowing you to leverage these connections for API calls. This approach offers several advantages:
- Simplified authentication: No need to authenticate to each FortiGate individually
- Bulk operations: Execute API calls across multiple devices simultaneously
- Centralized management: Use FortiManager as a proxy for all FortiGate interactions
Making Proxy API Calls
To execute API calls through FortiManager, you need to specify the FortiOS API endpoint within the FortiManager request structure.
Request Structure
| Parameter | Description |
|---|---|
| target | Device or group identifier (e.g., All_FortiGate group) |
| action | HTTP method (get, post, put, delete) |
| resource | FortiOS API endpoint path |
Example: Query Admin Account Settings
This example demonstrates querying admin users from all FortiGates in the ADOM using the hidden All_FortiGate group:
{
  "id": "1",
  "method": "exec",
  "params": [
    {
      "url": "/sys/proxy/json",
      "data": {
        "target": "adom/root/group/All_FortiGate",
        "action": "get",
        "resource": "/api/v2/cmdb/system/admin?format=name"
      }
    }
  ],
  "verbose": 1,
  "session": "{{session}}"
}
This is what the api looked like in FNDN for querying fortigate admin users (/api/v2/cmdb + /system/admin)
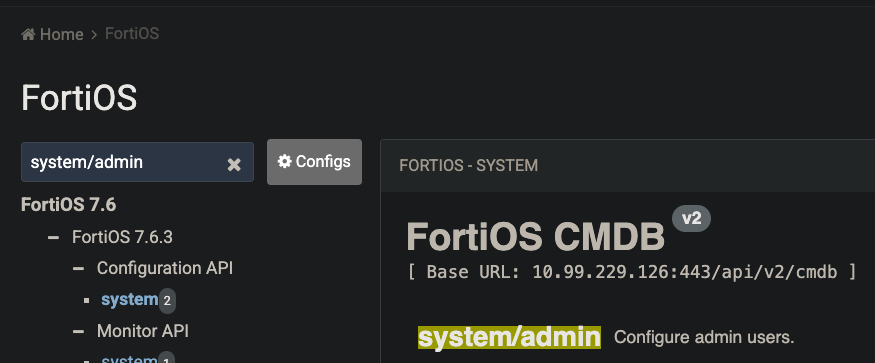
Make sure to check out all the options available with /sys/proxy/json here